
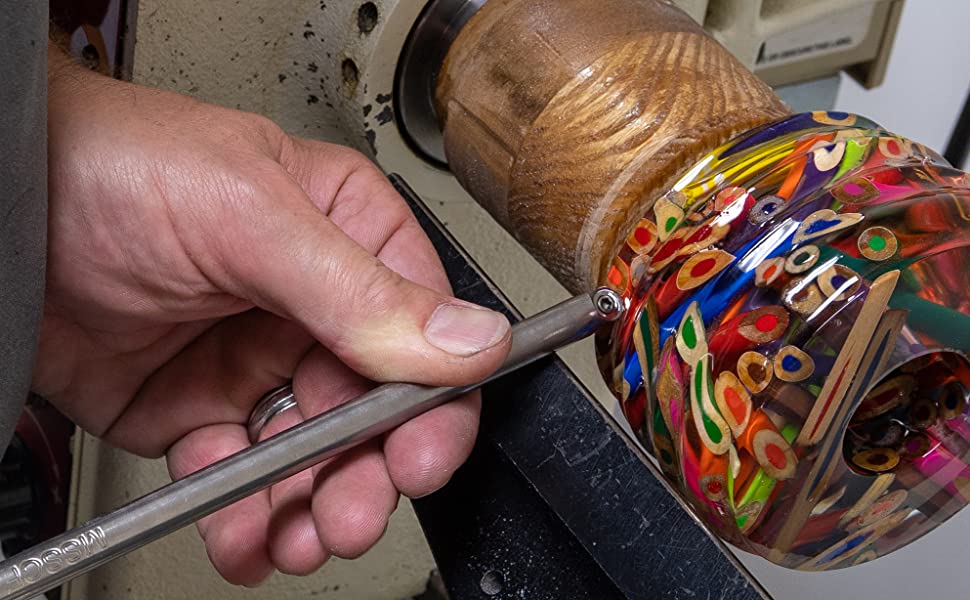
If you're a novice, you might be wondering how you can add texture to your woodturning projects. Ernie Conover shows you how to add texture to your woodturning projects. Textures can be natural patterns used to embellish objects in many different ways. These textures can be used to enhance your project's personality and design. There are many ways to add texture and color to your project.
Making a rolling pin
You might be curious about how to make a rolling Pin if you have recently started woodturning. Wood rolling pins are generally long and made of wood that is free of defects throughout. You can use any wood depending on the length of your pin. However, the best woods to roll pins are hard maple or cherry, applewood, ash, and similar hard woods. While some cheaper versions can be made from soft maple or birch, it is important to choose the right wood for your task.
Start by measuring the diameter of both the handle diameter and the diameter for the rolling pin. To measure the handle diameter, you can use the Parting Instrument. After measuring the handle diameter, the Roughing Gouge will be used to reduce the handle length until it reaches its desired diameter. After sizing the diameter, use the Bowl Gouge to make the rolling pin's curves. This will allow you to start threading the pin. After the rolling pin has been prepared, you can apply a food-safe coating and allow it to dry for 15 minutes.
Making a salt-and-pepper shaker
Whether you're looking for a unique gift or you'd like to have a handmade salt-and-pepper shaker in your home, there are many ways to make these handy utensils. For example, you could use a mason vase to create a salt-and–pepper shaker. Lightly punch holes through the letters using a small nail and your hammer. Place a cork through each hole, leaving 5/8 inch of wood at the ends. Add salt and pepper to the shaker and you can enjoy your creation.
There might be a few Coca-Cola bottles in your house that you don't use. You can make a salt-and-pepper shaker from these bottles. You have two options: you can tape the bottle to clean it, or you can paint it metallic gold leaf to add a detail. You can also use any colour of all-surface paint.
Making a bottle stopper
There are a few basic steps to making a bottle stopper. First, you must mount the blank between two centers. This creates a collet that can be mounted in the chuck. Next, turn the piece into the desired shape. After that, you will turn a threaded post to attach the decorative turned part to the bottle. There are many sizes of threaded post options.
Before starting the process, it is important to choose the right kind of wood for your project. You can find blanks in a craft center. Although the blanks are already squared, if the blanks are cut by you, make sure they are perfectly square. If you are buying wood from a retail store, you might need to square it up. If you don't have a chop saw, or tablesaw, you can use it instead. If you have an odd-shaped piece, use a clamp to help you square up the wood. Finish the job by sanding the stopper with fine-grit sandpaper.
How to make a stacked bowl ring.
When you make a stacked ring bowl for woodworking, you can create a large bowl by cutting two or more flat boards into concentric rings. The rings should be glued together with a dovetail joint. The boards should be approximately five inches wide and one inch thick. The faces of each board have been joined, and the joining edge has been planed.
You can cut a segmented ring bowl using a jig or trammel. The board thickness will determine how many layers are needed to reach the desired height. One-inch thickness is recommended, but not thinner than 5/8'" or 3/4". A trammel or circle-drawing tromel can be used to mark the lines of the band saw.
FAQ
What's the time taken to finish a piece furniture?
It depends on the size of the piece of furniture. A smaller project like picture frames or boxes can be completed in a single day. Larger projects such as tables and desks can take several days to complete. It takes time for the wood to be stained and sealed properly.
Where can I start woodworking?
The best way to learn how to build furniture is by building furniture. You will need tools. There are bound to be mistakes. But if your persistence is consistent, you will soon master the craft.
You should first choose the project you wish to complete. It can be something as simple and small as a box, or large-scale as an entertainment center. Once you've decided on a project, find a local woodworker who specializes in that kind of work. Ask them for their advice about the tools and where they can be found. You might even ask whether there's someone else you can talk to who does this kind of work.
What is the hourly rate for a woodworker?
The hourly rate for a professional woodworker varies depending on many factors, including skill level, experience, availability, location, and other variables.
An average hourly rate for skilled woodworkers ranges between $20-$50.
A less skilled woodworker might charge as low as $10 per hour.
How do I calculate woodworking prices
When calculating the costs of any project, it is important to keep them as low and affordable as possible. Always ensure you are getting the best possible price for materials. It's also worth taking into account all the other factors that may affect the cost of your projects, such as time, skill level, and experience. If you want to get an idea of what you can expect to spend on different types of woodwork projects, check out our guide to the average price of common household DIY tasks.
How do I know what tools are best suited for me?
It is important to consider your needs and preferences when shopping for tools. Do you prefer metal handles or plastic? What size are you most comfortable using for screws and nails? Do you prefer to use hand tools or power tools?
What's the difference between plywood vs particle board?
Plywood can be described as a mixture of layers and wood that have been pressed together with pressure. Plywood comes with a range of thicknesses, and it is most commonly used for flooring and cabinets. Particle board can be made from sawdust, resin, and then compressed to make large blocks. This board is commonly used in home improvement projects. Both boards can be cut easily and are both durable.
Where can I find free woodworking plan?
You don't need to purchase any books or magazines to find free woodworking plans. Search Google for free woodworking plans. Enter "free woodworking", and you will see hundreds upon hundreds of websites offering free plans.
Statistics
- Average lumber prices rose about 600 percent between April 2020 and May 2021. (familyhandyman.com)
- Most woodworkers agree that lumber moisture needs to be under 10% for building furniture. (woodandshop.com)
- Woodworkers on the lower end of that spectrum, the bottom 10% to be exact, make roughly $24,000 a year, while the top 10% makes $108,000. (zippia.com)
- In 2014, there were just over 237,000 jobs for all woodworkers, with other wood product manufacturing employing 23 percent; wood kitchen cabinets and countertop manufacturing employing 21 percent. (theartcareerproject.com)
External Links
How To
How to stain hardwood
The process of staining wood involves the application of chemicals to the wood's surface, which causes it to change its color. This chemical reaction causes wood to turn from whiteish to brownish. Oak is the most commonly used wood for staining, but other woods can also be stained.
There are several ways to apply stains to wood surfaces. Some methods include mixing the stain along with a solvent like turpentine and then applying the mixture to the wood by brushing or spraying. Others use a solution made up of water and dye, which is then applied directly onto the wood. The stain can be mixed with paints and varnishes to become part of the final coating.
Preparing the surface is the most important step in staining wooden surfaces. You must clean the wood well to remove any grease or dirt that might interfere with the application of the stain. Sanding the wood removes scratches and imperfections. The next step is to determine the type of stain you would like to use. There are two basic kinds of stains: penetrating stains and non-penetrating stains. Penetrating colors penetrate deeper into wood than those that are non-penetrating. This makes them more suitable for darker colors, such as mahogany. The best non-penetrating colors are those that work with light colors like maple.
After you've decided what type of stain to apply, get ready for your tools. Paintbrushes are great for applying stain because they allow you to evenly spread the liquid across the surface. After you're done painting, make sure to have some rags handy to remove any excess stain. If you plan on mixing the stain yourself make sure that you have enough containers to hold the different components.
Once you have prepared your materials, start by cleaning the area where you plan to stain the wood. Use warm water and soap to clean away dirt and dust. Use a dampened sponge and warm water to clean the entire piece. You should remove any debris, especially if your plan is to stain darker wood.
The stain should be applied next. Begin at one end and spray or brush the stain on the wood. Move slowly and carefully along the grain of your wood until you reach its opposite end. The stain should not drip off of the wood's edge. Allow the stain to dry completely before you move on to the next step.
A coat of clear polyurethane sealing agent is applied to protect the paint. Apply three coats with polyurethane. Allow the third coat to dry overnight, before sanding.